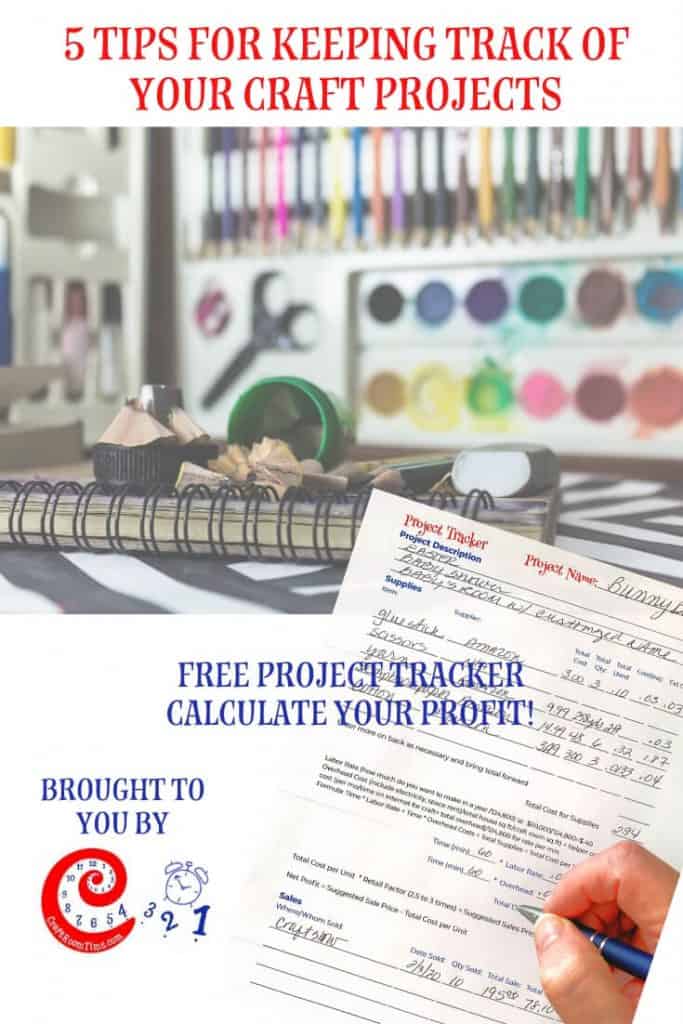
The struggle is real to keep track of all your craft room projects. From supplies, receipts, finished items, items in progress, craft shows, inventory, sales, you name it. For most creators, it is hard to keep everything organized. So I’ve put together 5 tips for keeping track of craft projects to share with you along with a free craft project planner.
The overwhelm can be daunting, but just like any other chore, it is easier when you break it down step by step and tackle each thing one at a time. Let’s take a look at these things and see if these 10 tips will help!
Best part is I’m going to send you all the pdf’s I talk about that I use to help me keep track of my craft projects. You can get them now by clicking here. Or they will be available again at the end of this article!
5 Tips for Tracking Craft Projects for Profit
1. Organizing Your Craft Room
Seems like a no brainer that the more organized you are, the easier it is to keep track of your craft projects right? Well, like I said before, creators are not always best at organizing. I’ve also seen that those that are great at organizing are seldom crafting. Weird right?
I fall into the second category, really good at organizing, yet never seem to have time to craft. Is that you? or are you always crafting and then looking into your room and wondering how the heck you can find anything?
The best part about having your room organized and adopting a clean up routine, is that you when you go to craft, you will have a much better experience each time finding what you need, knowing what you are out of, able to start crafting the minute you walk in! That’s the goal and the reason to keep your room organized.
Most creators I see that are not that great at organizing have piles of “stuff” everywhere. They are overwhelmed and just can’t seem to figure out how to begin. Just like my kid’s rooms when they were little, I would start by sitting in the middle of the chaos and start making piles.
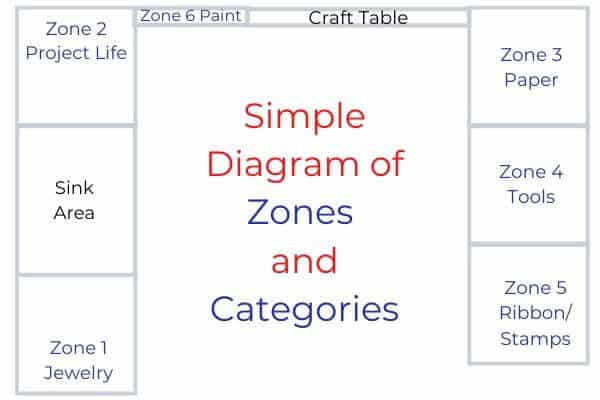
I organize my craft room into zones. I have zones for generic tools (scissors, glue, tape, etc.), paper, vinyl/cricut supplies, jewelry supplies, sewing supplies, etc. Above is the zones and categories that I have created for the top of the counters in my craft room as you saw in the video briefly. This gives you and idea of how to do this for your space.
2. Keep Track of Inventory
If you are just now starting your crafting experience or or already knee deep, it is important to know what you have. Just like grocery shopping, don’t you usually open the cupboards to see what you have before you go shopping? That way you 1) don’t overspend 2) don’t have duplicates 3) don’t run out of space in your kitchen to store duplicates 4) get what you actually need. The same applies to crafting.
I use this handy Inventory Tracking sheet to write down all that I have, and when I buy new things, before I put them away, I add them to the inventory tracker.
3. Define Your Craft Projects
If you are like me, I have 30 different craft projects going at once! Ok, maybe not that many, but it sure feels like that at times. So it is important that I have them organized, maybe not so visually, but at least on paper. When I start a new project, I start with my craft project tacker and have it handy in my planner to refer to and complete during the project. It’s a sheet of paper that has everything I need to know about the project.
Using my project tracker, I usually start by making a list of the materials needed. Then I go through my existing stash to see what I have and what I need for the project. That way I have my shopping list already done. It’s really quite easy doing it that way. Not only for shopping but then I keep that list in my Craft Room Planner and have it ready the next time I want to make that project.
A project tracker, at a minimum, should contain a place to put the name of your project and the supplies you need to complete the project. Take it a step further and include a place to put the location of your supplies if you use the inventory sheet from above. That way you will know exactly where to look for your supplies in your craft room.
4. Know Your Costs
On my project tracker, since I already have the supplies needed, I also list the cost of each item I purchase. Most items are purchased in bulk so I put the total cost on the line and then I’ll break the cost down to one unit. So if I purchase enough to make 10, I take the total cost of supplies needed and divide by 10 so I know the cost for one unit.
5. Pricing Your Craft Project to sell
I know – Math – ugh! But it is important to know what the numbers are so that you are making a decent profit for all your hard work! I’ll try to make this clear and easy to understand and follow.
Once you know your costs, it is easier to figure out how much to sell your projects for. The standard formula in the craft industry is this formula:
Time * Labor Rate + Time * Overhead Costs + Total Cost Per Unit = Base Cost
Base Cost * Retail Factor (2.5 to 3 times) = Sales Price
Time is how long it takes to make one unit. Say it takes 2 hours to make 10 units. The formula would be figured like this: 1 hour = 60 minutes so 2 hours would be 120 mins/10 units = 12 mins per unit
Labor Rate (how much do you want to make in a year / 2080) example: $50,000/2,080=$24.04 per hour (typical 8 hour work days x 5 days a week = 2080 hours) then divide $24.04 by 60 to get labor rate per minute = $.40 (same as $50,000 / 124,800)
Overhead Costs include electricity, space rent, helper cost, etc. per mo/ for rate per minute. This gets tricky if you are using your house. So to do this you will need to take the full expenses for your home (electric, gas, rent or mortgage) and divide by the total square footage of your home to get a per square foot cost and then multiply that by the square foot of your craft area. Like this:
| Rent/Mortgage | $1,500 per mo | 2,000 total sq ft | $.75 per sq ft |
| Electric | $200 per mo | 2,000 total sq ft | $.10 per sq ft |
| Gas | $50 per mo | 2,000 total sq ft | $.025 per sq ft |
Per square foot total = $.875 x 80 square foot of craft room (10 feet long by 8 feet wide 10×8=80 sq ft) = $70 total overhead then add helper costs $20 = $90 then divide by 124,800 = 7.21 (rounded) total overhead cost per minute
Total Cost per unit = Add up all cost of supplies / number of units made from supplies
Example: supplies cost $100 and I can make 75 units so my cost per unit is $100/75 = $1.33 per unit cost
Time * Labor Rate + Time * Overhead Costs + Total Cost Per Unit = Base Cost
Base Cost * Retail Factor (2.5 to 3 times) = Sales Price
In our example this would be:
Time to make one unit .12 x Labor Rate $.40 + Time to make one unit .12 * Overhead cost per minute $7.21 + Total Cost per unit $1,33
.12 x $.40 = $.048
+ .12 x $7.21 = $.8652
+ $1.33
= $2.2432 per unit Base Cost
Now to figure out how much you should sell if for, multiply the Base cost of $2.2432 by 2.5 or 3 retail factor. So either $5.61 or $6.80 (rounded) Sales Price.
Total Profit using 2.5 retail factor = $5.61 – $$2.2432 = $3.3668
This gives you a Gross Margin (Sales Price – Base Cost)/Sales Price) of $5.61 – $2.2432 / $5.61 = .60 or 60% gross margin
Gross Margin can then be compared to other products to see which ones are more profitable for you to pursue. So for example we have this one that is 60% and another project we did the formula on that came out to 50% gross margin. Which would you want to sell more of? The one at 60% because you are getting more profit from that one when comparing.
The important thing to remember is that if you change any of your costs, then you need to recalculate everything so you are aware of your changing margin.
There are several ways to get better margins. Look into purchasing at wholesale, refine your process so that you can make more units per hour, better utilize your craft space so the overhead costs are lower per square feet, and by lowering your helper costs by creating faster processes or eliminating wasted time.
Using a project tacker is also very helpful at tax time. If you keep up with it, you will have everything you need in one place to take to you tax preparer! Having it like this will save them time and you money because they won’t be spending their time trying to organize and calculate everything. Win – Win for you!
Make it even easier and get the 2020 Craft Room Planner for 50% off. It has 43 pages of everything you will need to stay organized in your craft room AND track all your projects as well. It is completely ready to print and put in a binder and it even has the binder cover and spline so you can easily identify it! Click here to see it now!
Have you seen the ebook I created for selling your handmade goods? If not be sure to get a copy and check out this post Tips for Selling Your Handmade Crafts
Pin it for later: