As autumn unveils its rich tapestry of warm hues and cool breezes, it’s time to bring the essence of fall indoors. What better way to do so than by adorning your living space with custom-made Fall-Themed Throw Pillow Covers? These cozy additions not only invite comfort but also infuse your home with the enchanting colors and motifs of the season. Join us on a creative journey as we explore the art of crafting your very own fall-inspired pillow covers.
Supplies List: Prepare for a crafting adventure by gathering the following materials:
- Plain Pillow Covers: Opt for neutral-colored covers as a perfect canvas for your designs.
- Cricut Machine or Fabric Scissors: Choose the cutting method that suits your preference and design intricacy.
- Heat Transfer Vinyl (HTV): Select autumnal shades like deep reds, burnt oranges, and rich browns.
- Fall-Themed Stencils or Design Files: Choose designs that capture the spirit of fall—think leaves, pumpkins, or cozy phrases.
- Iron or Heat Press: Necessary for adhering the HTV to the pillow covers.
- Protective Cloth (Optional): To prevent direct contact between the iron and the vinyl.
- Pillow Inserts: Ensure they fit snugly into your pillow covers for a plump and inviting look.
Estimated Duration: Embark on a crafting session that seamlessly combines creativity and comfort. The estimated time to complete your fall-themed pillow covers is approximately 2 to 2.5 hours, making it an ideal weekend project.
SVG Options:
- The Ultimate Fall SVG Bundle, Autumn SVG
- Fall SVG Bundle – Autumn SVG – Fall PNG
- Autumn SVG Bundle Fall Svg Pumpkin Svg
Step-by-Step Instructions:
Step 1: Select Your Fall Designs Start by choosing fall-themed stencils or design files for your pillow covers. Whether it’s a cascade of leaves, a whimsical pumpkin, or a cozy autumn phrase, let your designs reflect the warmth of the season.
Step 2: Customize and Cut the Designs If you’re using a Cricut machine, upload your chosen designs to the Cricut Design Space. Customize the size and details, and let the machine cut the designs from your selected HTV. If you prefer manual cutting, trace the designs onto the HTV and carefully cut them out with fabric scissors.
Step 3: Arrange the Designs on the Pillow Covers Lay out your cut designs on the plain pillow covers, experimenting with different arrangements. Consider the overall composition and balance of your chosen fall motifs.
Step 4: Iron or Heat Press Application With your designs in place, carefully follow the instructions for applying the HTV. Using either an iron or a heat press, press down on the designs, ensuring even heat distribution. If using an iron, consider placing a protective cloth over the designs to prevent direct contact.
Step 5: Allow to Cool and Peel Backing Once the designs have been heated and set, allow them to cool for a few minutes. Gently peel off the backing to reveal the vibrant and securely adhered fall motifs.
Step 6: Insert Pillow Inserts and Arrange Slide your plump pillow inserts into the freshly adorned pillow covers. Arrange them on your couch or bed to instantly transform your space into a cozy haven with a touch of autumnal elegance.
Step 7: Optional Embellishments (Optional) Feel free to add extra embellishments if you desire. Consider stitching around the edges, adding fabric paint details, or even sewing on fabric appliqués for an extra personalized touch.
You’ve successfully crafted your own Fall-Themed Throw Pillow Covers, turning your living space into a haven of autumnal comfort and style. These cozy additions not only invite relaxation but also serve as striking decorative elements that celebrate the beauty of fall.
As you sink into your plush pillows adorned with leaves and pumpkins, revel in the satisfaction of creating a space that mirrors the warmth and charm of the season. Stay tuned for more creative inspirations as we continue our series of festive DIY projects.
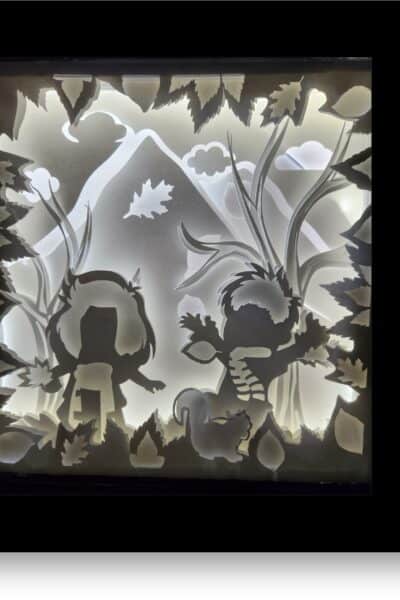
Next in the Series: In our upcoming crafting adventure, we’ll guide you through the process of making Woodland Creature Wall Art. Bring the enchanting spirit of autumn indoors with charming animal silhouettes that capture the essence of the season. Get ready for another round of creative joy!
Happy Crafting!
Leave a Reply