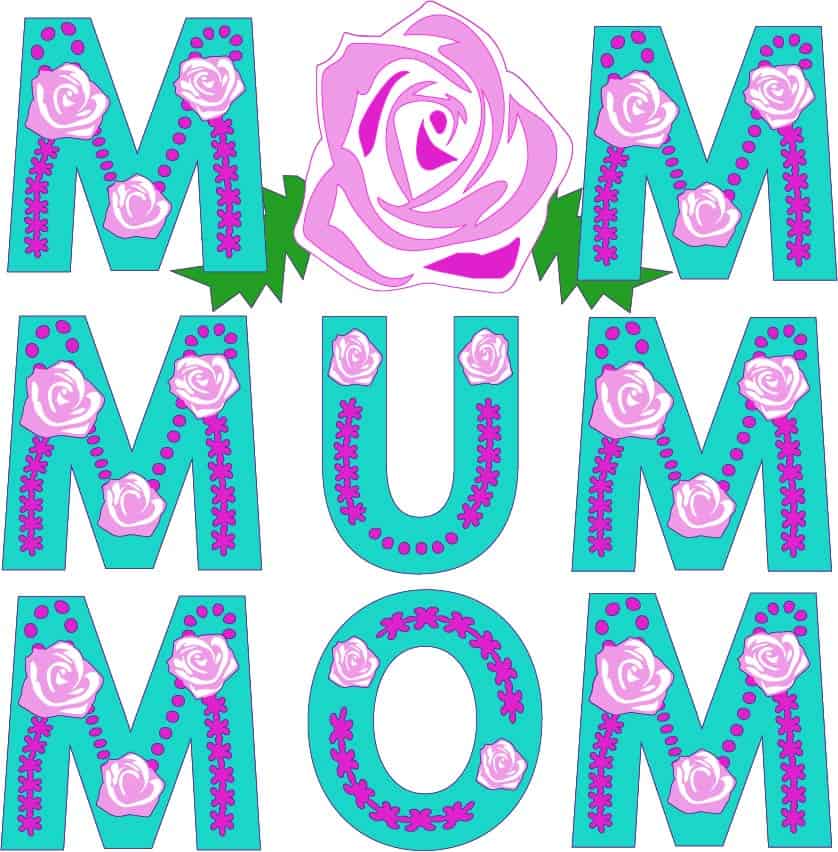
Mom’s are special. So why not make her a special 3D craft to let her know just how special you think she is! This free SVG gives you the opportunity to make a 3D Mom or Mum with Rose for Mother’s Day in her favorite colors that she can display proudly!
This design is easy to cut and put together so you can even get the kids involved. The Free SVG is available in the Resource Library. If you are not a member, find the sign up form at the bottom of this post and you will get the Free SVG and Password to the library to get all my freebies offered!
Catch the Video on how to do this…
This may contain affiliate links and we may earn compensation when you click on the links at no additional cost to you. For additional information, please see my full disclosure policy.
Supplies, Tools, Machine and Accessories Used
- Cricut Maker
- Mat
- Foam Double Sided Stickers
- 65 to 80 lb Cardstock in varying colors
- Cricut Brayer
- Cricut Scraper
- Premium Fine Point Blade & Housing
Instructions

Upload the SVG file. If you need help on how to do this, see the article How to upload and download in Cricut Design Space.

This file does have all of the available images and layers to do three different kinds of mom files or mum. Select it by clicking on it.
A green box goes around it, and it also shows down below in the tool bar. If you decide not to do it, you can always click the X and then it will clear it.
Click on insert image. It’s a rather large file and it comes in groups.

Ungroup it. You can delete these extra “M” you don’t need . Or go over to the right and hide it by clicking on the little eyeball to hide it. Same with the “O” and the “U” if you’re going to use the rose, you would just hide those.

Resize the “Mom” by selecting all the letters at the same time to maintain proportions. Then resize the rose to fit. Use the little box in the bottom right or type your sizes directly into the tool bar. For my project, I resized them to 4.75 inches tall.
Change your colors if needed , this will put them on the different mats that you’re going to need. There’s four different colored layers. Click Make It.


The design will automatically distribute on 12 by 12. You can change this to an eight and a half by 11, if that’s what you’re using and it’ll automatically redistribute them on the mats to the different colors that you need. You have to change the size for each mat according to the size of paper you are using.

Click continue. Select the material you are using. I used medium cardstock. Whenever I have little intricate cuts, I always like to do more pressure.
Make sure that you, have a nice sharp blade. You can do that and you can sharpen it or clean it with, tinfoil by poking it into tinfoil. that’ll help your blade to be cleaned of any vinyl or anything else that’s on it. That also add a little bit of a sharpening to it. For more Tips and Tricks, check out my handy guide here!
Load the material into your Cricut and cut out the design.


Use the foam dots in between the layers by putting them on the back of the layer that you’re putting on top of the other one so you don’t put them in the wrong place.
Put them closer to the edge, and anywhere that the letters might cave in.
Now your design is ready to put in a shadow box or on a board or whatever creative idea you have!
Want a more intricate design and you are a Cricut Access Subscriber? Check out this free design that is available to you then!