I have always been a huge Wizard of Oz fan since I was a little girl. I remember waiting anxiously to find out then it would be on TV so I could plan my whole evening watching the mesmerizing moves by all the wonderful castmates.
Then when Wicked came out to Broadway, I just had to know what that was all about. I had no idea there was a whole backstory to the wicked witch. How fun and especially at Halloween time! Perfect!!!!
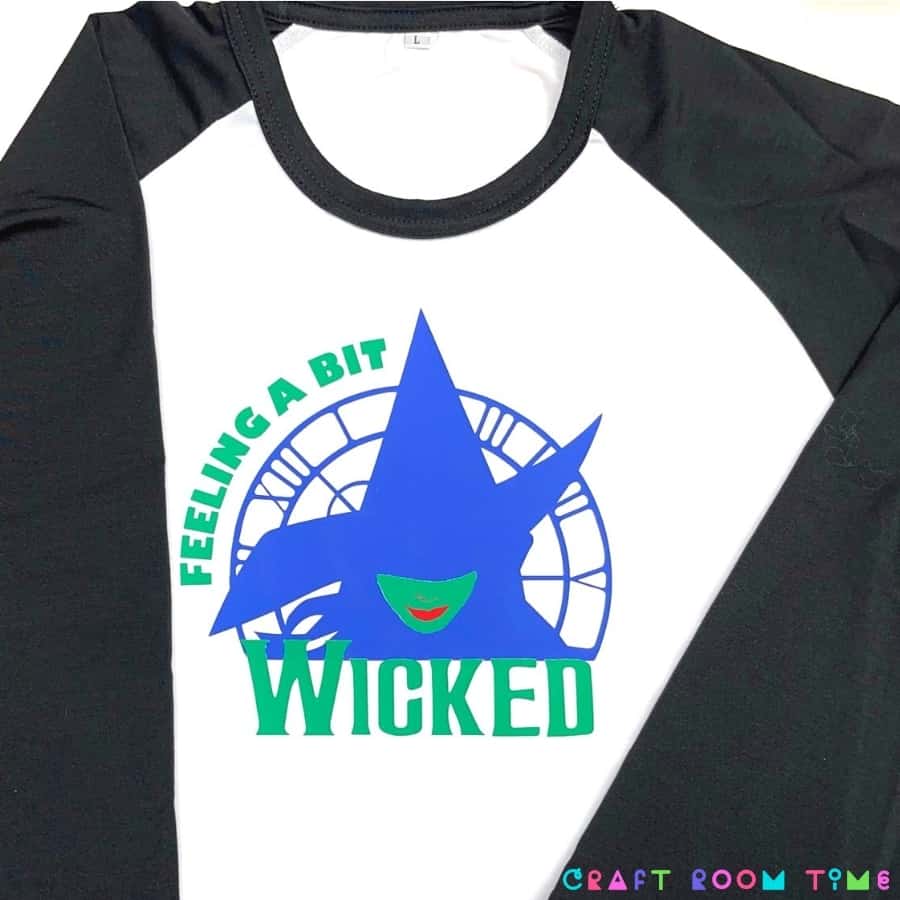
This year, I plan to see Wicked again and then watch the Wizard of Oz to complete my perfect Halloween season! For the occasion, I made myself this Wicked T-Shirt so everyone knows just how much this series means to me LOL!
You can make it too! Get the Free SVG by signing up at the bottom of this post!
The Free SVG is in the resource library for personal use and if you are not a member, you can sign up to get it and many other freebies! (commercial use designs are in the shop)
Now for the instructions! If you are a visual learner, like me, then go to my youtube video and learn how to bring it into Design Space and How to assemble here:
This post may contain affiliate links and we may earn compensation when you click on the links at no additional cost to you. For additional information, please see my full disclosure policy.
Supplies I used:
- I’m a big fan of this: HTV
- Cricut Machine
- Mat
- Weeding Tool
- Parchment Paper
- Cricut Brayer
- Easy Press Mat
- Cricut Easy Press
- Cricut T-Shirts
Instructions for I’m Feeling a bit Wicked T-shirt

Upload the file, then click on it and the green box around it then insert the image. Before you go any further, resize it to whatever you’re making so that it will fit . I did ita 7.376 by 7.364, almost square, but that’s a good size for a t-shirt. Resize it in the boxes or grab the corner and resize it.

When it comes in it’s all grouped together so un group it .

Move the blue off to the side for the green face part , if you’re using HTV, I suggest you make it just a tad bit bigger because HTV shrinks a bit when you heat it up. Make it about a quarter of an inch bigger.
For the red parts, go ahead and attach those so there’ll be exactly where they need to be when you iron them onto the green.
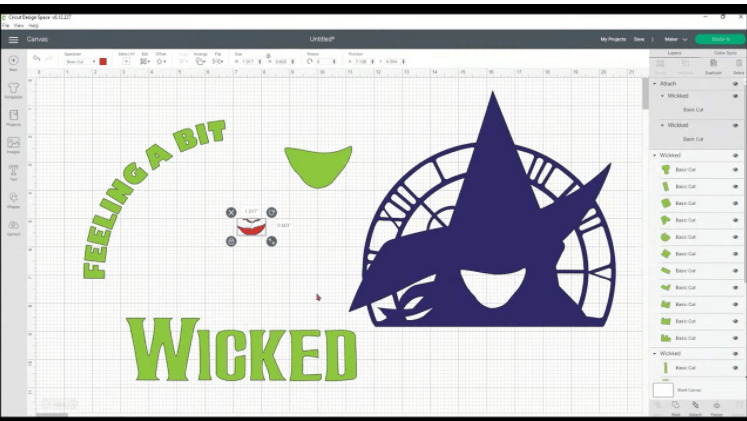
Attach all of the letters together so they will fit perfectly in the curved area.
Then attach the Wicked. Then go to make it.


If you are doing HTV then be sure to mirror and move the designs around for optimal fit.


Select your material for whatever material you’re using. You can also search in this little box right here or in the categories. So if you were looking for some vinyl, other vinyl, then you can pick there. The little yellow star moves it to the favorites on your first page.
Once it is cut by the Circut, cut around your objects as best you can. You don’t want to waste a lot of heat transfer vinyl, and it does make it easier to weed.


Be sure that the transfer is nice and straight.
I have a piece of parchment paper between the two layers of the shirt and then the Easy Press Mat below that. Set your Easy Press Machine for 315 degrees for 30 seconds. Go ahead and press the area that you’re going to put the transfer on. It’s best to do this because the heating up the shirt does a couple things.
It gets rid of all the wrinkles and it heats up the material so that it’s open and ready to accept the heat transfer vinyl.
Find the center of the t-shirt and sometimes you can use the tag to kind of look, to see where the middle is. There are so heat guides and things like that. I f you have my cricket book, I do give you some heat guide transfers that you can print out and use, for t-shirts that show you the center of the t-shirt using the guide.
I like to cover my material with the parchment paper. I just find it’s a cleaner, better transfer and it doesn’t mess up the rest of the shirt. Apply medium pressure on the vinyl as well. I want to make sure that it’s adhering to the cotton as best as possible. I’m using is the cricket t-shirt. So it is a higher polyester, content. So it does accept the transfers a little better than just a plain cotton t-shirt.


Check the corners a little bit just to make sure that everything has transferred. Always make sure that you follow the directions on your heat transfer vinyl as to whether it’s a cold peel or a warm peel. This one is a cold pill. I have the cardboard that came with the shirt and I’m just fanning it. This really cools it down a lot faster. I was kind of surprised by that, it does help make the process go a little faster. So now it’s cooled down to the touch that I can go ahead and peel it off, peel the transfer sheet off, and then just put that aside. You won’t need that anymore.


Then next we’re going to layer on the green parts, which is all the wording and her face.

So now we have all of the green and the little red pieces for her nose and her mouth and the piece is completely finished. So just let it cool down, peel off your final transfer tapes And you have a great shirt that you can wear for Halloween or anytime you’re feeling a bit wicked.