Exploring the Fusion of Block Printing and 3D Mandala with Cricut
Have you ever experienced the joy of block printing? The feeling of carving your own design onto a block and seeing it come to life with every print is truly magical. Now, imagine taking that enchanting art form to the next level by combining it with the mesmerizing beauty of 3D mandala designs. With the help of Cricut, the possibilities are endless. In this article, we will delve into the captivating world of block printing and explore how it can be elevated with the intricate ‘B’ 3D mandala, all crafted by Cricut. Get ready to be inspired, and let your creativity soar!
The Beauty of Block Printing: A Timeless Craft
Block printing has a rich history that dates back centuries. It is a craft that celebrates tradition, craftsmanship, and the joy of creating something unique with your own hands. The process involves carving a design onto a block, applying ink, and transferring the design onto paper or fabric. The beauty of block printing lies in its simplicity and the ability to create stunning patterns and motifs with just a few tools.
Step 1: Gather Materials
- Carving block (wood or linoleum)
- Carving tools (gouges, knives)
- Design or pattern for carving
- Ink or paint
- Brayer (ink roller)
- Palette or flat surface
- Paper or fabric to print on
- Cutting mat or protective surface
- Tracing paper
- Pencil
Step 2: Design and Transfer
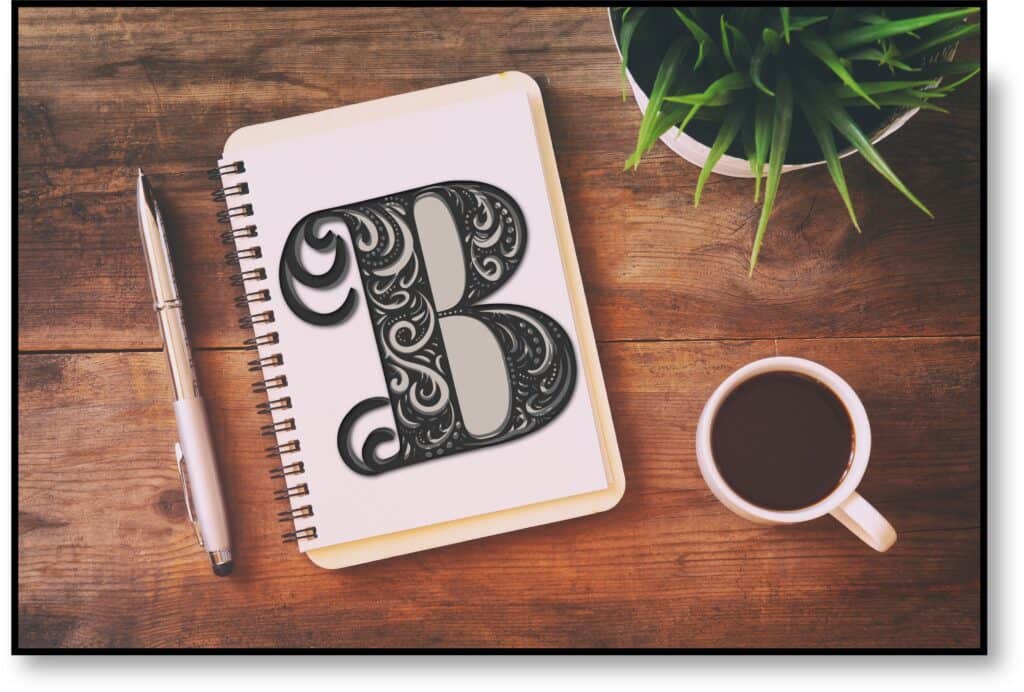
- Start by deciding on a design or pattern for your block print. You can create your own design or find inspiration from various sources. In this case, the beautiful Mandala letter B. You’ll need multiple blocks for this particular project (the number depends on detailed you want to get).
- Transfer the design onto the carving block(s) by placing a sheet of tracing paper over the block and tracing the design with a pencil. Press firmly to transfer the lines onto the block.
Step 3: Carve the Block
- Place the carving block on a stable surface, such as a cutting mat or table.
- Begin carving the design into the block using carving tools. Start with the larger areas and work your way to the smaller details.
- Apply steady pressure and make controlled cuts to remove the negative space around the design, leaving the raised areas that will hold the ink.
- Be cautious while carving to avoid any accidental cuts to your fingers. Take breaks as needed and proceed with patience.
Step 4: Prepare the Ink and Roller
- Squeeze a small amount of ink or paint onto a palette or flat surface.
- Use the brayer (ink roller) to roll the ink back and forth on the palette until it forms a smooth, even layer on the roller.
Step 5: Ink the Block
- Place the carved block on a clean, flat surface.
- Roll the inked brayer over the raised surface of the block, ensuring an even and thin layer of ink covers the design. Avoid excessive ink, as it may lead to smudging or unclear prints.
Step 6: Test Print
- Take a sheet of scrap paper or fabric and gently press it onto the inked block.
- Apply even pressure over the entire surface of the paper or fabric, ensuring it comes into contact with the entire design.
- Carefully lift the paper or fabric to reveal the test print. Evaluate the quality and adjust the ink coverage or pressure as needed.
Step 7: Print the Final Design
- Place the paper or fabric you want to print on in a flat position.
- Ink the block again and make sure the ink is evenly distributed.
- Position the inked block over the paper or fabric, aligning it with the desired location for the print.
- Apply even pressure to the back of the block, using your hands or a baren (a flat tool specifically designed for printmaking). Rub firmly and evenly to ensure good contact between the block and the printing surface.
- Carefully lift the block from the paper or fabric to reveal the printed design.
- Allow the print to dry completely before handling or further processing.
Step 8: Clean Up
- Clean the carving block and tools with soap and water, removing any remaining ink or paint.
- Store the carving block and tools in a safe and dry place for future use.
Download the letter B and start your new, incredible Mandala project with your Cricut.
Click Here –>>>
Unleashing Creativity with Cricut: Elevating Block Printing
While block printing on its own is captivating, Cricut opens up a whole new realm of creative possibilities. This innovative machine offers precise cutting capabilities, allowing you to create intricate stencils and complementary elements for your block prints. With Cricut, you can add depth, texture, and intricate details that take your block prints to the next level.
Printing the ‘B’ Mandala Design: From Block to Beauty
With your ‘B’ mandala block carved, it’s time to ink it up and create impressions on paper or fabric. Apply ink evenly to the block, making sure to distribute it across the carved surface. Align the block carefully, and with a gentle press, transfer the design onto your chosen medium. Each print reveals the intricate beauty of the ‘B’ mandala, showcasing the harmony between block printing and 3D designs.
Elevating the ‘B’ Block Prints with Cricut: Adding Depth and Detail
Here’s where Cricut truly shines. Use your Cricut machine to create complementary elements for your ‘B’ block prints. Cut out borders, frames, or intricate details that perfectly complement the 3D mandala design. Experiment with different colors, materials, and textures to add depth and visual interest to your prints. Let your creativity soar and explore the myriad possibilities that Cricut offers.
Showcasing Your Masterpiece: Sharing the Joy of Handmade Crafts
Now that you have created your breathtaking ‘B’ block prints, it’s time to showcase your masterpiece. Frame them as artwork to adorn your walls, incorporate them into handmade cards to delight your loved ones, or create unique fabric pieces for fashion or home decor. Share the joy of your handmade crafts with others and witness the delight they bring to those who behold them. Handcrafted creations have a way of spreading happiness and igniting conversations.
Unleash Your Creativity with Block Printing and Cricut
In this journey of block printing and 3D mandala designs, you have witnessed the fusion of traditional craftsmanship with innovative technology. The ‘B’ 3D mandala, crafted by Cricut, has brought a new dimension to your block prints, transforming them into captivating works of art. As you continue your crafting endeavors, let the magic of block printing and the endless possibilities of Cricut inspire you to explore new creative horizons. Embrace the joy of crafting, and let your imagination break the mold, one block print at a time.
Ready to get crazy with the entire alphabet?
<<<– Click here to download all the letters and really spark your imagination.
Mandala Promo Code: UNLEASH2023 FOR 50% OFF
Happy Crafting!